Showing posts with label Terrain. Show all posts

01 July 2017

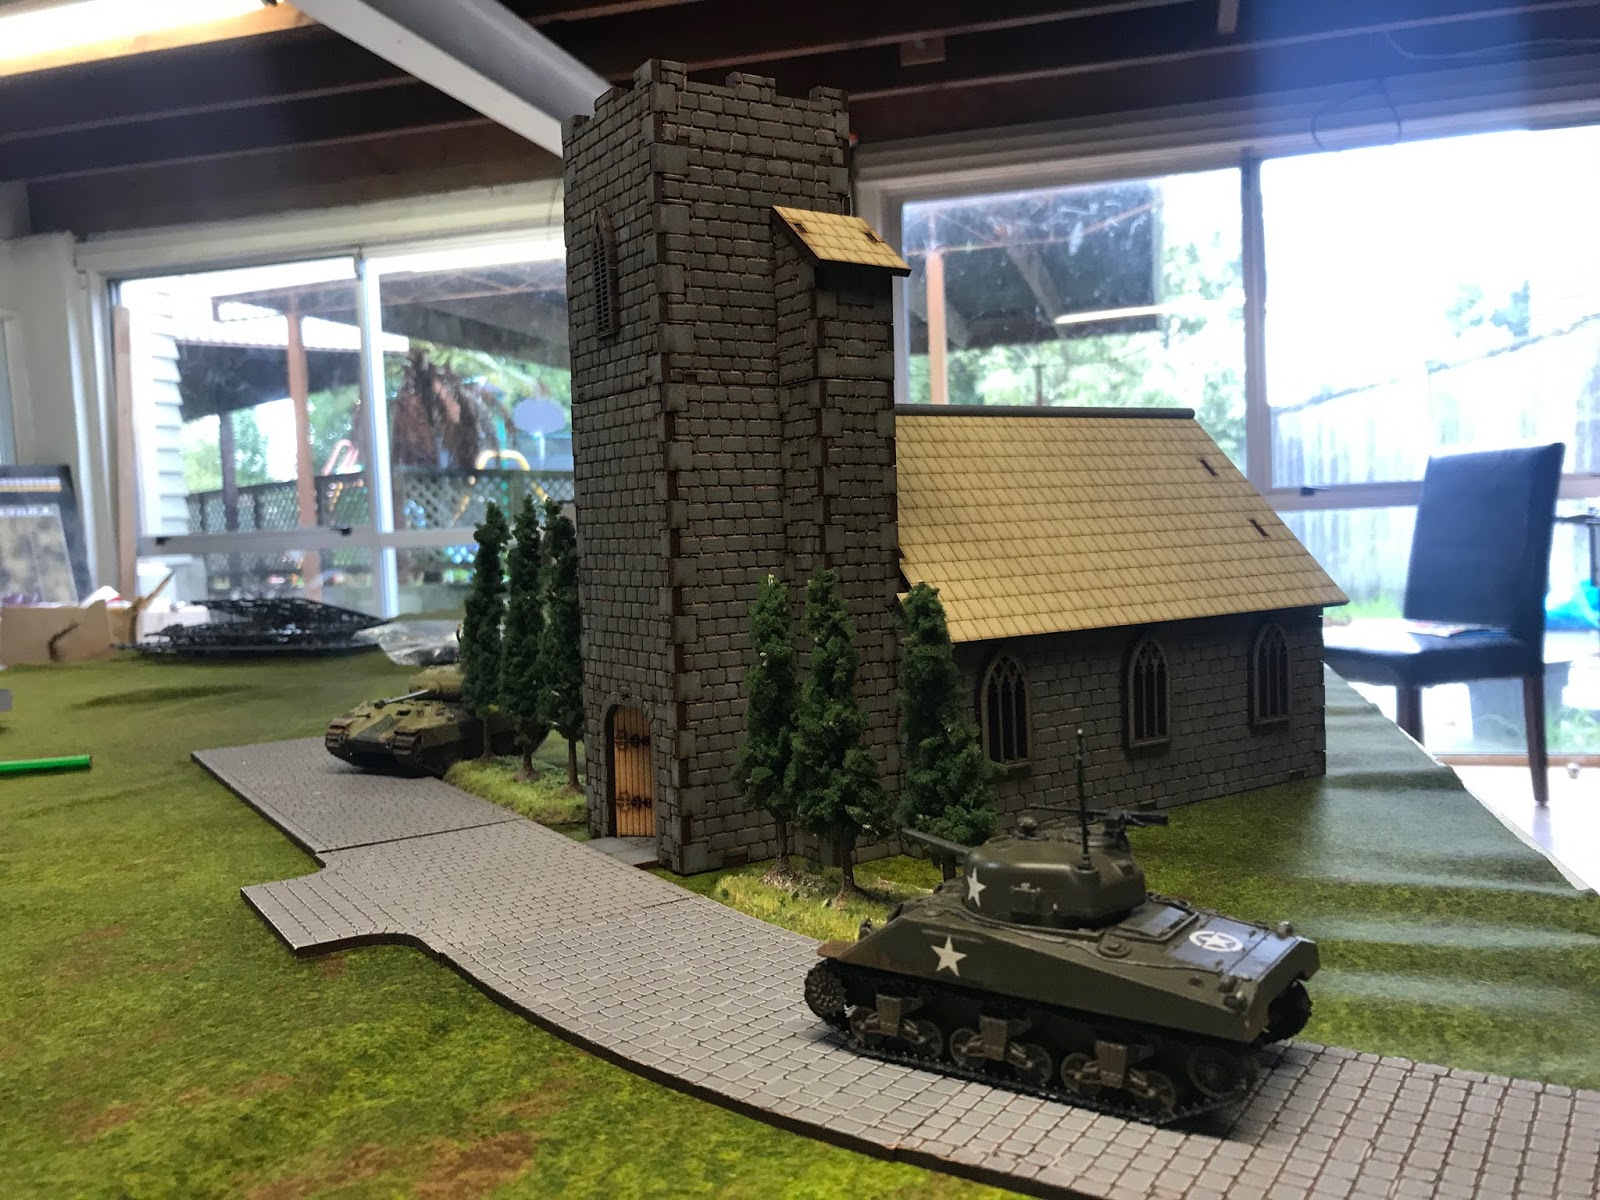
Review: Battlekiwi Church


- with Greg

This is a kit I've been wanting to get my hands on for some time and now, I finally have it! It's definitely taking pride of place in my terrain collection! I love it so much, I even filmed a video review to accompany these words!


The Battlekiwi Church IS A MONSTER on the table! It takes up some serious real estate when it's placed down.


The parts of the tower and the roof are all removable allowing for troop access to the inner sanctum...


The laser-cut detail is really nice as well meaning that you don't actually need to paint this one if you dont want to.


Obligatory action shots!


This kit can be ordered from Battlekiwi now, using the link below and if you use the code BEL5 at check out, you'll get a 5% discount!

https://www.battlekiwi.com/product/the-church/


20 January 2017

Review: Kreative Scenery's Low Adobe Walls

- with Greg


So what goes well with a Large Adobe House? Adobe Walls, that's what! 

Now you already get a few with your large house, but if you're anything like me and quite enjoy hiding your infantry behind bulletproof cover then you're going to want some more walls. So, Kreative Scenery have your infantry cover needs....well....covered....!


Your new adobe wall set gives you four long straight sections and four small straight sections which you can use in a heap of different ways and combinations.


And you can use as many or as few as you like to get some really good looking linear obstacles for your 15mm battlefields.


And you know what, they'll even hide your big cats if you want them to!


Once again, we've been set the painted versions of the walls and the detail and paint job really is great! I've taken a couple of close-ups here just so you can see the detail.


Pricing on these bad boys for all out international mates, in $US, is going to be $US18.50 for the painted versions (just like the ones above) or if you want to paint your own, then the set will be $US12.95. Shipping is additional but pretty damned reasonable. Kiwi buyers, just hit up your friendly Trade Me store to get the sharp $NZD pricing! 

Dan and I also recently trialled the Low Stone Walls in our recent Batrep over on the BEL YouTube so why not head on over and check that out...


15 January 2017

Review: Kreative Scenery's Large Adobe House

- with Greg


In the latest review of the kit sent in the care package from Kreative Scenery, I take a look at the Large Adobe House set.

This is a big package and that's because you are getting a heap of stuff in the pack including:

- 4 adobe walls
- the adobe building ground floor
- the building second floor, and
- flat roofs for both

We were also luck enough to get the optional extra roof as well (thanks Kim!)


Once again, we've gotten the pre-painted version here but you can order this unpainted if you want to have a different colour scheme. Everything fits together really nicely and cleanly.


This shows the optional Italian roof added but you don't have to add it and the kit will still look the business.


You can also just have a single story version if you like.


By adding the included walls to the kit, you can get a really nice looking terrain piece on your Italian or African-themed table.


And they hide Tigers quite nicely!


The house itself can comfortably fit 3 infantry stands inside and a couple on the roof if you don't use the sloped one.


Pricing on this one is pretty good as well! Again, I'll list the $USD prices below.

- Unpainted will set you back USD$26.25
- Painted is going to cost USD$33.00.
- Painted with the additional sloped roof is USD$34.00

You can order these now over at www.kreativescenery.co.nz but if you are in NZ, go on over to the Trade Me page and you get them a wee bit cheaper!

So if you're looking on getting some terrain together for a new African themed table for...say...a new version of Flames of War, now's the time!

10 January 2017

Review: Kreative Scenery's 15mm Low Stone Walls

- with Greg

And I thought Christmas was over! Kim from Kreative Scenery has sent us a care package today with some awesome terrain to use and review and I've gotta tell you, upon opening the box and taking a peek, I knew I was in for a treat!

Kreative Scenery (www.kreativescenery.co.nz) are a Kiwi company specialising in 15mm and 28mm Hydrocal terrain and can supply these to you either painted or unpainted depending on your needs.


In this review, I'll be having a play with the Low Stone Wall set. 


The set consists of two small and one large right-angled sections and three straight wall sections. 


We've been lucky enough to get a painted set so we can get the review straight to you! Thanks Kim! The paint job here is great and will fit this terrain into pretty much any table you could think of!

And of course I had to have a little bit of a play with my own toys, right?


The Hydrocal (which is a type of plaster from what I understand) is sturdy enough to take some knocks and hold up well which is exactly what you want from gaming terrain! It's gonna take some bumps...right?!


For our international friends, fear not! All the pricing over on the site is in USD and you can pay by PayPal to make things easier. This set of walls is going to set you back USD$18.50 for the painted set or USD$12.95 for the naked versions if you're wanting to paint them up yourself. Shipping's calculated when you checkout but is based on what and how much you order.


For you Kiwi's out there who are keen on ordering a set, head on over to Kreative Scenery's TradeMe Store to order yours. Ordering here means you get them a wee bit cheaper as well, which cant be bad?!


As gamers, we can always use more terrain right, so if you're in the market, head on over and give Kreative Scenery a look...and make sure you tell them Greg sent you!

04 April 2016

PTO Terrain: Shrine

with Mike

I've been on the hunt for a small Buddha statute to make into a jungle statue for my Vietnam terrain, but I've had little luck. However, I saw a little shrine in the aquarium section at the local pet shop and grabbed it for $10.

With my Pacific terrain project starting up in force, I've brought this out for some finishing. While shrines like these may not have been seen on the island hopping, they were certainly in southeast Asia where the Japanese empire clashed with British commonwealth forces. So, it'll certainly see use at some point!

This is how the piece came straight from the pet shop:


I decided that at this point I'm not going to spend any time on the structure itself as I thought it's pretty much tabletop ready. I might give it a touch up at some point in the future, but I'm more interested in getting terrain pieces done for some PTO games, rather than getting mired down in the details. Once I have a solid collection I'll think about upping the realism a bit more.

Anyway, the base certainly needs some attention, so I stripped out the plastic plants and repainted the thing dark brown. Then, using my earlier jungle terrain tutorial, I added some of the plastic foliage pieces and flocked the base with green static grass and some dark green and red meadow flock.


Boom, sorted.


Maybe one day I'll get a little ambitious:


Thanks for reading! Let us know what terrain projects you've got on the table!

28 March 2016

PTO Terrain: Bamboo Groves

with Mike

As my PTO terrain project continues, one of the things I wanted to make was some bamboo groves. These should complement my jungle pieces and hopefully take a bit of the load off them in terms of tabletop coverage. I planned to do 12 pieces, but in the end I did 6... you'll see why!

As usual I start with a little visual research. Luckily I didn't need to go far:


The bamboo stalks were colored in a few shades of green and brown, so I made sure to include that in my notes. I also noted that the foliage tended to grow in groups with a stretch between them. Finally, the grove is quite dense, so I would need a lot of them.

Right, building supplies:
  • 3mm MDF board
  • Bamboo skewers
  • Leaf tea
  • PVA/wood glue
  • Aquarium plant mats

Tools:
  • Jigsaw
  • Drill
  • Sanding block
  • Hobby knife
  • Hot glue gun

Painting Supplies/Tools
  • Airbrush
  • Tamiya Olive Drab
  • Tamiya Khaki
  • Vallejo Iraqui Sand
  • Vallejo German Camo Bright Green
  • Vallejo English Uniform

I decided to use the standard Battlefield in a Box 'kidney' shaped bases so that I could position the groves on the larger tree bases that I use for my NW Europe trees. Alternatively, they are large enough to be stand alone groves, as with my jungle pieces. I used the Shattered Battlefield bits as my templates.


I cut out the bases using a jigsaw, drilled a bunch of holes in them and then sanded them flat. I went a bit overboard on the holes, just to make the bamboo as dense as possible. In the end I probably didn't use all of the holes, but it gave me some options, rather than have too few and have to drill more later.


I picked up about six packets of these bamboo skewers because they were approximately the right size for the job. Earlier packets I bought were too large and toothpicks were too small (for gluing foliage to). So when I found them, I stocked up.


I cut the skewers into 1.5" to 2" sections. I needed about 25-30 trunks per base, so for 6 bases, that was about 150 to 180 in total.


I rolled the skewers under a hobby knife to score a grove around it and then simply break it off. In this photo and the one above, you can see a failed experiment where I cut additional groves with the intention of inking out the trunk's segment. I say failed, but it would have worked fine as the experiment proved, but not economic for 150+ of the little bastards...


Next up is the dead foliage that collects at the base of the groves. For this I used my standby ground vegetation: leaf tea. Leaf tea is courser than that of the stuff out of a teabag, but you could use that as well if you wanted to. I've liked leaf tea for a while and have used it extensively.

I covered the bases in a layer or PVA, followed by a sprinkling of leaf tea.


Next I used a skewer to poke out the holes and clear them of leaf tea. I held them up to a white surface to see if I got them all.


Then the trunks got glued into place.


The base got a coat of Tamyia Olive Drab


Then a highlight of Tamyia Khaki


Finished the base with a drybrush of Vallejo Iraqui Sand.


Bases done.


For the trunks I mixed up a watery solution of Vallejo German Camo Bright Green. It was about 40/60 paint to water. I painted about 80% with this light green color. The others I painted up with Iraqui Sand.


Then the tedious part! On the green trunks I painted 5-6 Iraqui Sand colored circles. On the tan colored trunks I used Vallejo English Uniform to paint the circles.


Next up the foliage. It's the same stuff as what I used in the Jungle Pieces tutorial as my mainstay vegetation.

I've cut the leafy parts from the cup thing, resulting in a lot of foliage!


Using a hot-glue gun, I've attached a layer of foliage about half-way up the green trunks (avoiding the brown ones).


Next I put a layer atop the trunks.


To finish it off I touched up any loose bits of the Leaf Tea, and painted any exposed areas of wood.


My first reaction to these pieces is that the leaves are rather large, but I'm OK with that if it at least looks fine at a glance. I might also be talked into doing some taller pieces as they seem a little uniform in height. In the end, they seem to do the trick.

Right, the next thing to sort out is some bamboo scatter terrain!

Thanks for reading!