Showing posts with label V4. Show all posts

19 February 2019

Flames of War - New Plastic Soviets

Have you ever wanted play a Soviet Mid war army but because you are weak there's no way you could transport 50kg's of lead from place to place?

Well have I got news for you the new Mid-war Soviet range is all plastic. Battlefront were nice enough to send me some samples I was expecting maybe a sprue or two but imagine my delight/horror when this arrived...


Well shoot now it looks like I have to start a Soviet Army...again. 

Affordability

Back in 2003ish Battlefront released the very first Stalingrad book for Version 1 I splashed out and purchased a full 1500 point army boxset I think it set me back about $370 in the day but I got a lot of stuff.


Did you want an army or a hernia? Why not both?!


Now to get the equivalent in the new plastics would cost around $290 (I substituted SU-122 for SU-85's) giving me saving of about 30% so not bad on savings also we're comparing 2003's buying price with 2019 and I'm not going to get into inflation. So the new Soviet army ticks the affordability box however it's always going to be more expensive than it's German equivalent simply because you need more but a sub $300 army to choke the guns of the fascists is worth it!

Quality

A scary man once said the quality of quantity has a quality of it's own which is a Russian for they'll run out of bullets before we run out of bodies. I had the chance to open and assemble the Storm Group box as it contained a bit of everything.


Coming to an occupied building near you!

Firstly we should compare them to the first lot of blue plastics the British Infantry ( Video ) figures are light years a ahead in detail and crispness they even have paintable faces! 

Clean up is a breeze using the hard edge of my scalpel it was a simple matter of light scraping and the excess plastic came off for larger bit the blade is used but go lightly as a sharp scalpel is likely to bite and gouge.

One issue I did happen upon was bending and this was with a few of the PTRD teams their guns because of the way they're packed have a tendency to bend.

 It's for shooting tanks around the corner!

The great news however a quick dip in hot water and a small bit of manipulation and they're shooting true again compared to the orginal metal PTRD's which were prone to mold slippage and a thin barrel that would bend and never be able to be put straight. You also get more 6 large bases for $18 vs $13 for 4 medium bases so bendy barrels is a small price to pay, or lack thereof.

How do they compare with my old Soviets?

To be honest great actually really well so much so that from a distance you'd have trouble figuring out which were old and new. I painted up a base to show as a comparison below. 


Asides from one being made of metal and the other plastic is that there is a coat of matt varnish on the metal one.

Final Thoughts?

The new Battlefront Soviet flexible plastic infantry are a vast improvement over previous offerings. The details are solid and they take paint exceptionally well and are great value for money. Although they may be prone to bending this is easily rectified and they only thing I dislike is that I have to paint so many. Definitely worth the money. 


16 April 2018

Armoured Fist - Kingforce and the 40th (The King's) RTR


Things have been slightly busy at the BEL HQ, mostly with power cuts and other going's on, but time for us to get back on track. We promised you Churchills, so here they are....with an extra treat as well!


The North Irish Horse


To field the mighty Churchill, you're taking it as part of the 78th 'Battleaxe' Division at Longstop Hill.

You'll need to take a Churchill III Armoured Squadron HQ initially. This has a number of options for you to consider:
- 1 x Churchill III with its 6 pdr and 2 x Churchill CS with both a 2 pdr and 3" in the hull position.
- 1 x Churchill III and 1 x Churchill CS
- Either 3, 2 or 1 Churchill III tanks.

The Churchill CS is a great option here giving you both some direct fire AT on the heavily armoured chassis, as well as the 3" gun providing you an additional artillery option to dig infantry from their foxholes.

For your Platoon choices, you have a compulsory selection of a Churchill III Armoured Troop. This can consist of either 2 or 3 Churchill tanks.

Your second compulsory choice can then be either another Churchill Troop or you can take a Sherman Troop along side them.

You can then either take another Churchill or Sherman option as well as slots for 2 more Churchill Troops. Rounding out your Formation selections, there is also the option for a Rifle Platoon which we'll cover in another article.


Dan is especially looking forward to getting a game in with these monsters as he's had a Kingforce list built for a while. Keep an eye on the Behind Enemy Lines YouTube!


40th (The King's) RTR


Fielding the nimble and well-armed Valentine tanks, the 40th (The King's) RTR gives you these in spades!

Your Formation HQ is going to have 3 Valentine II tanks armed with 2 pdr AT guns at your disposal. These do struggle to get infantry out of foxholes as they have no HE, but this can be made up for elsewhere! You will have the benefit of the excellent armour protection the Valentine provides though.

You'll then need to take a minimum of 2 (up to a max of 4) Valentine Armoured Troops which can either be equipped with:

- 3 x Valentine II tanks, or
- 2 x Valentine II and 1 x Valentine VIII armed with the long barrelled 6pdr.


I must say, I like the idea of getting some Valentines built and on the table. They a pretty good all-around tank despite their short-comings and with the right support choices, they can really cause Jerry some problems!

Next up, we'll start looking at the infantry, but until then....


22 March 2018

Armoured Fist - 7th 'Desert Rats' Armoured Divsion


Today we'll start having a look at some more detail on the formations you can choose from in Armoured Fist. In this article, we'll be looking at the 7th Armoured Division, the Desert Rats.


The 7th Armoured Division became one of the most famous units in the whole war after seeing extensive action in North Africa against the Italian and German forces.

Through the desert campaigns, the differing brigades of the Desert Rats would be equipped with many different weapons including Crusader, Grant and Honey Stuart tanks.

In Armoured Fist, you'll have the option of fielding a number of different formations to represent the Desert Rats.


The Royal Scots Greys

The Royal Scots Greys has a proud history as a cavalry regiment dating right back to the end of the English Civil War through the Napoleonic Wars. At the start of WWII, they were a true cavalry regiment stationed in Palestine and was then reforming into an armoured regiment in 1941, training and honing their skills initially on the Honey Stuart before being equipped with the more powerful Grant.


Fielding the Royal Scots Greys in Flames of War means you're taking a Grant Armoured Squadron. You must field a Grant Armoured HQ consisting of either 2 or 3 Grants tanks. They're pretty well drilled these boys, you're hit on 4+ and they have a Motivation of 4+ as well, although you'd best hope too many don't bite it because your Last Stand is 5+. The Grant does benefit from Protected Ammo though, so you're remounting on a 3+

From that point, you have 2 compulsory choices to make. One of these must be a Grant Troop of 3 Grants. Your second choice could be either another Grant Troop, a Crusader Troop or a Honey Troop. You then have an option of another Grant Troop, should you want to take it (I would!!!)


County of London Yeomanry

You'll have opportunity to field a formation based around the 4th County of London Yeomnary (4th CLY) which was taken from it's sister unit in the 3rd CLY and then assigned under the command of the 7th Armoured Division. In Armoured Fist, you'll be fielding units from either B Squadron or C Squadron, both of which were equipped with the Crusader cruiser tank.


As always, a Formation HQ is your first choice here. You have two options with this one:

1. 2 Crusader II with 2 pdr and 2 Crusader CS with the 3" artillery gun, or
2. 1 Crusader II and 2 Crusader CS

Your compulsory choices then start with a Crusader Troop. You do have a choice to make here because you can take either a Crusader II Armoured Troop with 3 Crusader II tanks armed with 2 pdr guns OR you can take a Crusader II & II Troop which you can build with either 1 Crusader II and 2 Crusader III tanks or vice-versa.

The Crusader crews are a little more gung-ho than their brethren in the Grant so they have a To Hit rating of 3+. They have the same Motivation and Last Stand as the Royal Scots Greys but when it comes to skill, they need to get into Jerry's face quick smart! This is represented by the Tally Ho rule which gives them faster speed at the expense of tactics. Not a bad trade off....

Your second compulsory choice can then be either another Crusader Troop or you can add a Grant Troop for some heavier power.

Finally, you have the option for an additional three Crusader Troops to round out your formation.


The 8th King's Royal Irish Hussars

Another unit with an illustrious history, the 8th Hussars can trace their unit's lineage all the way back to the 17th Century and was also one of the units to participate in the Charge of the Light Brigade in the Crimean War...obviously not in Honey Stuarts though!


As you may have guessed, taking the 8th Hussars means you'll be fielding a Honey Armoured Squadron. These little tanks are quick and if they get into the sides of those pesky Panzers, the 37mm gun packs enough punch to deal with them!

Your Squadron HQ allows you to field either 3 or 4 Honey tanks. The are very similar to the 4th CLY in that they're hit on a 3+ and have a 4+ Motivation/5+ Last Stand. Much like the Crusaders, you want to get these in FAST, and so at the sacrifice of some skill, you move faster... 12" Tactical or 16" over terrain.

You have to take at least 1 Honey Troop consisting of 3 tanks. Your second choice, again like the 4th CLY, can either give you another Honey Troop or a Grant Troop for some heavy support.

The formation can then be rounded out with up to 2 more Honey Troops.


The Royal Wiltshire Yeomanry

Whilst not technically part of the 7th Armoured Division, I have included the Royal Wiltshire Yeomanry here to have a look at. In Armoured Fist, they're based on A Squadron of the 9th Armoured Brigade, 2nd NZ Division at El Alamein.

What's that mean? It means Shermans!


So, into the formation. You'll need an HQ which in this case consists of between 2 and 4 Sherman tanks. The tankers in the Shermans are a little more careful with their tanks so they're hit on a 4+. They maintain the Motivation 4+/Last Stand 5+ of the other British tank units though.

Into your compulsory selections, you've first got to take a Sherman Armoured Troop. Here, you have 2 options. You can either tank a Troop of 3 Shermans or you can mix it up and take a Troop with a Grant and 2 Shermans. This is representative of 3 Troop being armed with Grants at El Alamein.

You other compulsory choice can be another of the above or you can choose either:

- A Grant Armoured Troop,
- A Crusader Armoured Troop, 
- A Honey Armoured Troop or,
- A Churchill III Armoured Troop (which we'll cover in the next article...)

From there, you have another optional slot which can be either a Sherman or Grant Armoured Troop and a final optional slot which can be Shermans.

This has the potential to get some pretty well rounded arsenal on the table, depending on what points you're playing.


So that's gonna do it for the Desert Rats and our extra special guests. Next time, we'll be taking a look at the 78th 'Battleaxe' Division. Churchills!!!!

10 March 2018

Back into the Desert - Armoured Fist Review


With the latest volume for Flames of War Mid-war, we're back on to the Allied side of the ledger and now look at some more of the British Forces that fought in North Africa, this time the tank forces in support of the 8th Army.

Armoured Fist is going to allow you to field formations from the following:

7th 'Desert Rats' Armoured Division

- The Royal Wiltshire Yeomanry fielding the mighty Sherman.
- The Royal Scots Greys and their Grant's.
- The County of London Yeomanry fielding varying Crusader models, and
- The 8th Hussars and their Honey Stuarts.

6th 'Mailed Fist' Armoured Division

- 'Death or Glory' squadron comprising various tanks including Valentines and Crusaders.

78th 'Battleaxe' Division

- The North Irish Horse fielding the heavy Churchill tank
- The 40th (The King's) RTR and their Valentines 
- The Rifle Companies of the Argyll and Sutherland Highlanders


You'll also have access to support options for all formations to cover you in terms of air support, artillery support and other facets of combined arms.

As we've come to expect from these volumes from Battlefront, they're decked out with fantastic colour shots of the forces in action as well as a bunch of historical information on the battles in the desert such as Gazala and the Battles of El Alamein. 


Each of the different parts of the Divisions listed above allows you to field formations of specific British or American tanks in British service to suit your taste. From there you can select your support options as you'd expect.

If, for instance, you wanted to take a force of the might Churchill III (and with the coming plastic kits from Battlefront, why wouldn't you?!), then you're immediately looking at a North Irish Horse force to take these monsters.


While I won't be looking at each of the individual units in this article, I am going to take a look at what I think is my favourite; the Death and Glory Boys of the 17th/21st Lancers.


Like most other formations as part of V4 Flames of War, you have some compulsory choices to make here.

Your formation HQ can be made up of either:

- A Valentine III HQ with either 1 or 2 Valentine III tanks supported by 2 Crusader CS in both instances, or
- A Lee HQ with 3 Lee tanks.

From there, you must take:

- A Valentine III Death or Glory Troop of 3 Valentine III tanks, and
- A Crusader III Death or Glory Troop of 3 Crusader III tanks.


From there you have 2 more optional slots which you can fill with an additional Valentine III squadron or either another Valentine Squadron or another Crusader III Squadron.


I think the thing that excites me most about this one is the nature of how you play them. You just get straight up into your opponents grill with fast tanks like the Crusader while the highly armoured Valentines roll in behind to mop up.

You have to get them in there quick because they're Aggressive, meaning they're hit on a 3+ and while they have relatively good armour, you still need to make sure you have a few that make it through. 

With a few carefully selected support choices, you really have the makings of a great force!


So, there's your introduction to Armoured Fist. Over the next few articles, we'll delve a bit deeper into some of the other forces at your disposal.

And don't forget.....the like it up 'em.

14 January 2018

List Building from Avanti - Damo's Carri Compagnia


-with Damo 


 *Disclaimer: My phone takes really shitty photos...


 When I started using the Italians as my very first Flames of War force (beta testing v.1!) they were always one thing to me; Hilarious. 


 Under-gunned, outmatched by most opponents and no-one else in their right mind fielded them. Good enough for me. (I won Natcon 2003 with them. Heh.) I wanted a "Ferrari tank rush" army. Full speed ahead and die for the glory of Il Duce!


With Flames of War v.4 coming out last year, I decided to bide my time until the glorious Italians got their own book. It's (almost) here now and we at Behind Enemy Lines are grateful Battlefront NZ allowed us early access. Chur Pete!


 All my Italian armies through the ages have had one common theme. Tanks. Lots of (little) tanks. It's my jam and so my V.4 list carries on my obsession. I've started by building a single formation to 85 points. It simply gives me room to move, either to 100 pts or less.


 HQ- no brainer here. 1 M14/41. (Are you surprised?)


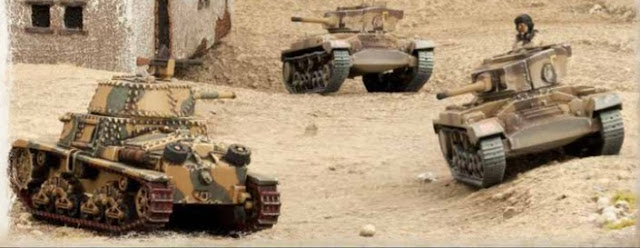
Next, I take 3 combat platoons of five M14/41's. One can never have enough MG's to get the job done on the PBI. With six MG shots per tank, that's a lot of hurt on anything caught unprepared. Hard luck for them. The main gun is only AT6 but has HEAT rounds. Cool. I can live with that. Armour is a relatively low 3-1-1 so they might survive a round or two of shooting. However, no matter what rating they get on the new 8 Million Bayonet table they will always remount on a 2+. (This is good.)


So that's my compulsory choices sorted along with the optional 3rd platoon of M14/41's because ...well... MG's.  I desperately wanted a platoon of Semovente 75's as well and for about a minute I was panicking that I'd have to ditch a platoon of m14/41's until Dan pointed out that I could take those bad boys as an optional support option. Wahey!

One platoon of 6 Semovente 75's in the mix and I'm almost a combined arms force! These can fire as artillery and the 75mm main gun is AT8. They also have a self-defence AAMG. That's pretty good firepower and with their 4-1-1 armour, they're almost a real tank! Can't wait to get some side shots off on some Shermans or T-34's....


With a tread count of 22 "tanks" so far I think it's time for something different...


AA is still a thing in V.4 so I better include some of that I guess...


One platoon of 4 truck mounted 20mm Breda dual purpose AA guns fills another support platoon. I only ever owned 2 of these trucks but luckily I found two Sahariana jeeps with the same gun. Proxy in those fantastic looking vehicles and away we go. I still have points left over to get to the 85pt limit I set for myself so let's head over to the coolest thing in the Italian arsenal.


One platoon of two Lancia 90's- the truck mounted 90mm beast of a gun. Just like an 88 but Italian made. Bene! Just awesome!


4+ save, a move or shoot built in, the gigantic rule. Who cares? Not me. They have AT14, shoot at planes, shoot at tanks, head shot some infantry teams, just take them! Trust me!


The last thing I need is some airpower because, let's face it, I need it to pretend I have some form of artillery (ignoring the fact my Semoventes can fire as arty too.)


One flight of two Falco bi-planes- I only have one biplane but that's no problem as I still have an Italian Stuka to sub in as a proxy biplane. What a nutter.


Well, that's my list. I have a few things to paint up but 90% of my Italians are good to go. (Thanks Monkey, your paint job is still brilliant.) Of course, as I've already said I can go up or down points-wise and perhaps use some of the card options available now or when the Italians get their own ones. 

I do have the quick option of adding 2 platoons of 5 L6/40's as well which will take me to 95 point, leaving 5 left over for card shenanigans as well, pretty quick and simple as it is!


See you on the battlefield...


12 January 2018

Here Comes Il Duce! BEL reviews Avanti!


Well, maybe not Benito himself, but his forces are definitely on their way to defend their interests in Africa with the latest release from Battlefront for V4 Mid War; Avanti!

As you've come to expect from Battlefront, Avanti is a beautifully presented volume with a heap of colour pictures, great historical coverage of the major aspects of the Regio Esercito Italiano (Italian Royal Army) and their place in the battlefields of North Africa.


Continuing on with the desire to keep initial selections easier for newer players, Avanti allows you to choose from three different formations for your Italian forces. These include a Tank Company choosing from either the M14/41 Medium tank or the Semovente SP gun.


You'll need to take a Tank Company HQ comprised of a single M14/41 tank. From there, you must select 2 tank platoons with the option for a third if you'd like it. You can choose from either the M14/41 platoon, which gives you access to between 3 and 5 M14/41's, or you can choose a Semovente SP Battery containing between 2 and 6 Semovente's. 


You'll note that there are two sets of stats for Motivation and Skill on these and we'll discuss this a little more later on.


Your second formation option is the Bersaglieri Weapons Company. After the massive losses taken at the siege of Tobruk, the Italian's reorganised their forces in a 'fewer men, more weapons' scenario.

As always, you'll need to take the Weapons Company HQ consisting of 2 Carcano rifle teams. From there, you must take at least one Weapons platoon up to a max of three, and also take at least one 47mm Anti-tank platoon up to a maximum of two.

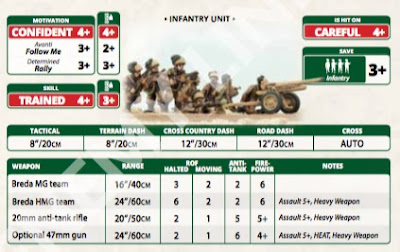
You have both full and short options in the Weapons platoon. The full option will give you a platoon with 3 Breda MG teams, a Breda HMG team and a 20mm Anti-tank rifle team. In the short option, you're reduced to 2 Breda MG teams. In both cases, you also have the option of adding a 47mm AT gun.

Your 47mm AT platoons are pretty much as they wrote. You can choose from between two to four 47mm AT guns. These are great for ambushes, a seriously cool little gun in MW!


And of course, your final option is the Bersaglieri Rifle Company, the well-regarded backbone of the Italian forces in North Africa.


The Rifle Company HQ is compulsory with it's 2 Carcano rifle teams. You'll then need to take at least 2 Rifle Platoons, with the option for an extra one. As part of the formation, you can also choose to take a Breda MG Platoon, an Assault Mortar platoon, an 81mm Mortar platoon and up to 2 47mm AT gun platoons.


Your Rifle platoons come in full and short versions here, with the full platoon consisting of 9 Breda  MG/Carcano Rifle teams while the short option only has 5 teams. Selecting the Breda HMG platoon gives you a platoon of 3 Breda HMG teams.

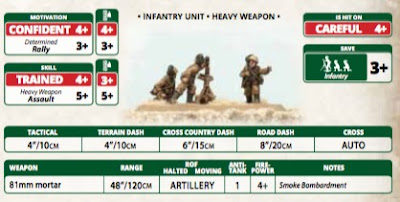
On the infantry artillery side of things, the Assault Mortar platoon gives you some direct fire mortar action which can fire over any teams in front to either add some pins or possible lay down smoke. There are 3 teams in this platoon. For something a bit heavier, the 81mm Mortar platoon gives you either 2 or 3 mortar teams. The 81mm mortar has a better range than the British mortars meaning they have a little more survivability.


8 Million Bayonets

One of the coolest things about the Italian army in V3 (and something I know Damo was fond of) was not knowing just how good your troops would be until they actually got on the table. The issue was the large volume of combinations that there could have been. 


This has been simplified in V4 through the extra column on the Motivation and Skill stats we pointed out earlier. After you've deployed, but before the first turn, you roll your 8 Million Bayonets die and if you roll the Elite symbol (left) then you get to use the improved stats! If you don't have an 8 Million Bayonet die, you can just use a d6 and any roll of 5 or 6 means you have the Elite troops. Easy as that!


Italian Support

The Italian Army in Africa has quite an array of support available to them. We'll have a look at the options you have here and then discuss the potential for German allied platoons as well, a relatively new addition to V4.

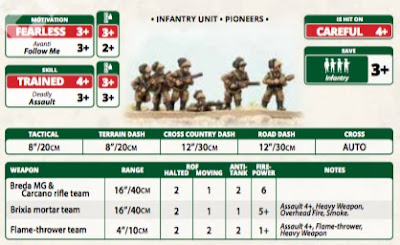
The first support we'll have a look at is the Assault Engineer platoon. This is what you take to get into those pesky dug-in infantry positions. You can have a full or short option on this one. Taking the full option will give you Breda MG/Carcano rifle teams, 2 Brixia mortar teams and 2 Flame-thrower teams. The short option reduces you to 3 Breda/Carcano teams and a single Brixia and Flame-thrower. I think this platoon is a definite addition for me, so much firepower!


Next up, the AB41 Armoured Car platoon. You can have either 3 or 4 Armoured cars here to provide both a Scout option for your force or to provide some fast fire support for your infantry. 

As further infantry support, you could also choose an L6/40 Light Tank platoon. You'll have access to between 3 and 5 tanks. These things are super cute, but don't let their diminutive size fool you, they can pack a punch!


Moving on to some heavier support, we're going to take a look at the awesome 90mm Lancia Anti-tank Battery. Similar to the Afrika Korps, the Italian Army found that their heavy AA guns somehow made amazingly powerful anti-tank guns as well. Mounted on a Lancia Truck for added manoeuvrability, you can get between 1 and 4 of these bad boys.

Because the Italian factories couldn't keep up with the demand for the 90mm AA gun, the Italians also purchased a number of the German 88mm for added barrels in the field.


Moving on to the Italian artillery, you've only got a single choice here in the 100mm Howitzer. Your battery can contain either 2 or 4 guns to lay down support fire for your infantry. A well-placed shell also has the potential to take out the British armour in the desert.


Rock me Amadeus! Air support in the desert is provided the rugged CR.42 Falco biplane. Your flight consists of 2 planes and they can either drop their bombs or strafe with the 12.7mm MG's. 


And to make sure you don't get shot down on your way in, you can also buy some dedicated AA in the form of the Autocannone, the 20mm AA gun mounted on a truck. You can have either 2 or 4 AA trucks.


Afrika Korps

As well as using Italian support, you now have the option of taking German allies in support of your Italian troops (and vice versa as well!). You can choose to field two compulsory  German units as Allied units but could also field a whole German formation as a support formation. If you don't have a copy of Afrika Korps, Avanti also gives you the stats for the German compulsory units for you!


Finishing off Avanti, as always, you have painting guides for your Italian forces with details of how to get them on the table.

Coinciding with the release of Avanti, we'll also be seeing new plastic model releases from Battlefront, including the plastic kit with the M14/41 hull and parts to allow you build them as either the M14/41 or the Semovente!


Next up, we're going to take a look at building some sample lists from Avanti for you...so until then...

'Scusi!