Dan showed us some great techniques here in these videos, so let us know what you think! And please, don't forget to Like and Subscribe! We still love that kinda thing!

19 February 2016
Dan Paints! USMC Sherman - Part 2
And now for the the dramatic conclusion in which Dan finishes off his USMC Sherman painting tutorial!
Dan showed us some great techniques here in these videos, so let us know what you think! And please, don't forget to Like and Subscribe! We still love that kinda thing!
Dan showed us some great techniques here in these videos, so let us know what you think! And please, don't forget to Like and Subscribe! We still love that kinda thing!

Jungle Scatter Terrain & Rules

by Mike

The concept of scatter terrain is an interesting one. Unlike normal terrain, it’s meant to represent ambient terrain, that is to say the common terrain that most tables just take for granted and not display. Sometimes, but not always, scatter terrain in Flames Of War is purely cosmetic and has no impact on the battlefield, such as telegraph poles, single trees, or sign posts, etc. But in the jungle, scatter terrain can be made to be more important.
Furthermore scatter terrain serves an important role as a terrain amplifier. So, for my terrain collection, I decided to have a go at some scatter jungle bits. Not only can I use the Elephant Grass rules on my table, it also serves as a way to “fill out” the table in a much more realistic way, taking some of the pressure off the larger Jungle Patches, crops, and rice paddies.
Often you'll see wargames tables that have a lot of open spaces, and for some games that's important (like ancients), but the tables end up looking very unrealistic with smooth flat surfaces between terrain features. The great thing about scatter terrain is that it breaks that up so that the table looks full and interesting, even if, by the rules definition, it's not. Here's a quick before-and-after of a Pacific/Vietnam battlefield first with no scatter terrain, then with some.


The above uses about 75 pieces of scatter terrain, about half of what I'd like to see on there. Rather than make more of the same, I will instead make some different types of scatter terrain, including battle wreckage, sugar cane, bamboo groves, etc.
Once I have more larger terrain pieces I can adjust the amount of scatter terrain up or down depending on what I'm going for. In the meantime I feel as though the table is ready for some preliminary PTO or Nam games, especially if I use the Elephant Grass rules from Flames of War: Vietnam.

So at this point you can just play the game without the scatter terrain, but after playing a lot of Nam games with elephant grass terrain markers on the table, it just adds that extra level of realism as well as serves as a very important visual reminder that that open field isn’t so open and perhaps you should put a bit more firepower over there!
Elephant Grass Rules
Source:
http://www.flamesofwar.com/Default.aspx?tabid=109&art_id=4112
If you want to add further interest to your early war battles in Asia, try playing your games with the Elephant Grass rules from Tour of Duty (FW901). As a side note the FoW: Vietnam book: Brown Water Navy (FW903) has even more jungle and riverine related rules for those interested.

Away from the villages, and even in gaps in the jungle, rice paddies give way to ‘elephant grass’—the soldier’s universal catchall for tall grasses. This ranges in height from knee high to well over a man’s head. The ground beneath can range from hard-packed earth to flooded and muddy depending on the season.
When present, elephant grass usually covers the areas of the table that aren’t covered by other terrain. It is easiest to have the elephant grass the same height across the whole table. You can either select the height of elephant grass at the start of the game, or roll a die and use the Elephant Grass Table (an option we found added an extra challenge!) Make up some patches of elephant grass and scatter them across the table to indicate the nature of the terrain.
| Die Roll | Elephant Grass Height |
| 1 | Knee High |
| 2 or 3 | Waist High |
| 4 or 5 | Head High |
| 6 | Taller |
All elephant grass is Slow Going.
- Knee-high grass has no effect on visibility whatsoever.
- Waist-high elephant grass does not limit visibility, but is Concealment for troops and guns moving on foot (although not vehicles).
- Head-high elephant grass allows vehicles to see and be seen, although everything is Concealed, but limits visibility to 6”/15cm between troops on the ground.
- Taller elephant grass hides vehicles and limits visibility to 6”/15cm like a wood.

18 February 2016
Dan Paints! USMC Sherman - Part 1
This week over on the Behind Enemy Lines YouTube account, our resident painting instructor shows you the methods he uses to get that iconic USMC paint scheme on your Pacific tanks. This one is so good, it's a two-parter so keep an eye out for the rest coming soon!
The one thing different about the USMC tankers was their use of improvised armour on their vehicles, especially wood planks to ward off magnetic mines. Given the Japanese propensity for suicide attacks with their much-feared Nikuhaku teams, the USMC started adding additional layers to their Shermans in an attempt to stop the incoming attacks.
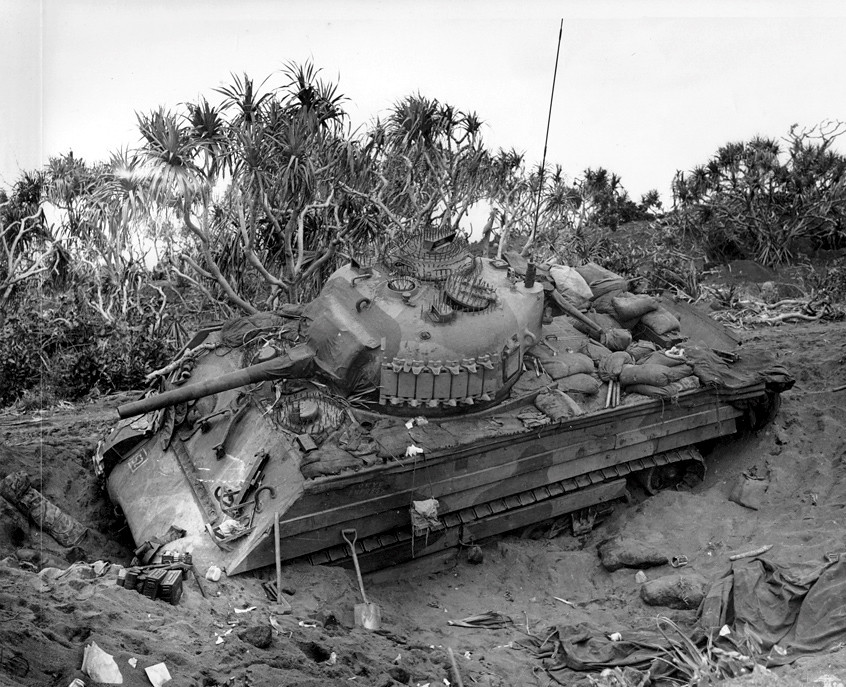
Dan's really had some fun with this one as well, so let us know what you think! And please, don't forget to Like and Subscribe! We love that kinda thing!

The one thing different about the USMC tankers was their use of improvised armour on their vehicles, especially wood planks to ward off magnetic mines. Given the Japanese propensity for suicide attacks with their much-feared Nikuhaku teams, the USMC started adding additional layers to their Shermans in an attempt to stop the incoming attacks.
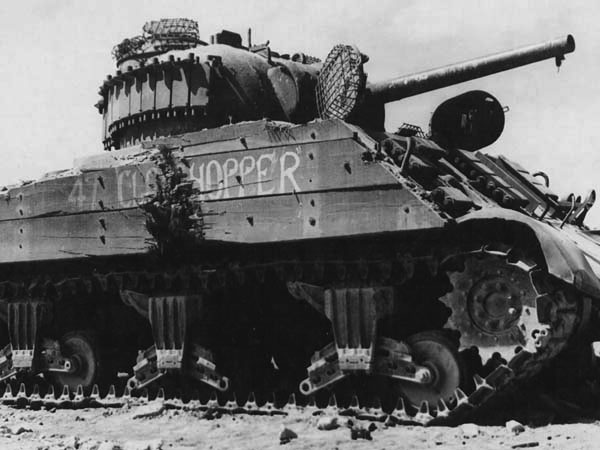
17 February 2016
Making Jungle Terrain Pieces

When I was getting into Brown Water Navy for Vietnam, I knew I was going to need a lot of jungle terrain. It’s a rather iconic piece of terrain for the region, so I wanted to make sure I had a lot that I could spread out across the battlefield.
After looking around online I found some good tutorials out there, so be sure to have a look at those as well as this one and take the bits that work for you and your project.
Step 1: Gather Foliage
Most projects seemed to use plastic aquarium plants so I decided to give that a try. So after many trips to the local (and not-so-local) $2 shops, AliExpress, and pet stores, I gathered samples of all different types, including palm tree cake decorations, artificial seaweed, floral accents, and aquarium tank mats. But that’s not the only sources. I’ve seen people use lichens, clump foliage, and more. Here’s a few examples of artificial plants I found.

When you’re shopping for plants, there are three things to keep in mind. First some of the more complicated looking plants can be broken down. Have a close inspection of them and see if they can be broken up into smaller pieces. Second, some of the larger ones might be cut down to smaller pieces manually, such as ferns. Finally, the last thing to consider is how you’re going to actually fix it to the base.
Another thing to consider is color. I chose to go 95% green with a few highlights of bizarre colors here and there like purple and white. These help keep things interesting, but be careful or your pieces will end up looking more like a sci-fi jungle than a real one.

When gathering your foliage, it’s a good idea to choose a single type that will be the common base plant for all the pieces. I chose a leafy bush that I could get enmasse on aquarium mats. This ensured I had a large supply of common plants that I could use across the collection that would ultimately tie them all together visually.


Step 2: Make Bases
Next I carved a bunch of different shapes and sizes of bases. I made sure that the bulk of them are small enough to fit in the kidney-shaped forest bases from the Battlefield in a Box range. That way I can use the option to put a couple jungle pieces on a base and use the normal forest rules (that’s not to say there weren’t fir or deciduous trees in the PTO).

Also, another trick is to use the pegs from the aquarium mats to fix some plants onto the pieces. This is useful for large clump vegetation. My recommendation is to cover the green “cups” up with smaller vegetation and clump foliage.

The goal here is to make sure that the bases can be used independently as well so that there’s got some versatility in their use. I made some round bits as well as some long narrow river-side bits for Nam. In Vietnam, the jungle was cleared up to the river with agricultural fields right behind, leaving a small strip of jungle between the fields and the river. This was also true elsewhere in the Pacific, but it’s also good for roadside linear terrain on plantations. So those will be good for my Pacific tables as well. In the end, choose the shapes and sizes that works best for you and your table!
I added some vinyl spackle for texture and painted the bases brown. I then applied some GF9 and Woodland Scenics flock and static grass to them. I did this because I made the n00b mistake of attempting to do that after the plastic plants were in place. It was a nightmare trying to get into the middle of that jungle (who would have guessed!).

Step 3: Drill Holes and Install Plants
Then I drilled a billion holes into the base. I’ll then cut up the vegetation into smaller single plants and just start gluing them into the holes using a hot glue gun. It’s a tedious process, but after a while you get into a rhythm.

One thing to consider at this step is that you should think about clumping like plants together, like these nippa palm fronds that I cut from a palm tree that was waaay to big for 15mm terrain. These re-purposed fronds work well together and form a sort of palm-wall.

Spread out the sections of unique plants and concentrate them inside the jungle base. In doing so, make sure that you leave space for your basic plant.
Step 4: Thicken Foliage
As you might recall I chose the leafy bush plant to be the common plant across all of my pieces. The primary function of these pieces is to thicken out the piece so that you get a lot more mileage out of your more unique plants (and favorite plants. Bizarrely, you’ll bond with some and be sad when you use the last of them). First I installed plants, cups and all, along the centerline of the piece where I left some of their original pegs. Then I took some more of the bushes and separated them from the cups and glued the smaller sections into the holes around the edge of the piece to conceal the center cups and any deformities.

Step 5: Clean Up
Once all the glue has dried it’s worth giving all the plants a tug to test their durability. Remove any hot glue hairs you might find and cut the stems from under the base so it sits flat. Then you’re done!
Well, almost.
Step 6: Dust Up
The final step is one I credit to James Brown at Battlefront. I was not happy with the bright waxy texture of the plastic plants, so he suggested that I dust them with a khaki spray paint. So holding the aerosol about a 16”/40cm higher than the piece, I sprayed over them, letting the paint fall onto the plants. This created a marvelous effect in the end, so thanks James!

And now you’re done. One down, 60 more to go...
16 February 2016
Behind Enemy Lines Podcast Ep. 22!

Come have a listen as the guys talk rubbish for an hour and then talk about the stuff you're really interested in, #FoWPacific!
Listen Now! Episode 22 ...
-or-
Download the episode here
(right-click and Save As)
Welcome back for another packed episode of Behind Enemy Lines! This week we’ve got a lot to talk about including n00b news, AARs from DanCon III, and a careful review of Battlefront’s Pacific books for Flames of War...
(right-click and Save As)
Welcome back for another packed episode of Behind Enemy Lines! This week we’ve got a lot to talk about including n00b news, AARs from DanCon III, and a careful review of Battlefront’s Pacific books for Flames of War...
- In Act I, we talk about n00b news and look at some upcoming kickstarters, including the highly anticipated Explorers of the North Sea!
- In Act II, we each talk about DanCon III, the greatest most random FoW event in all of West Auckland. Heads up in this section, low flying aircraft inbound.
- In Act III, we dive into the Flames of War Pacific books: Banzai and Gung Ho and give you the inside scoop on these great books and talk about our chosen lists.
Thanks for listening! We'd love to hear your thoughts, so please leave questions, comments, and feedback below!
Subscribe to:
Posts (Atom)