28 April 2018

France in WWIII


The coming release of Free Nations will soon give you the opportunity to field NATO forces from either Canada, France, the Netherlands or Australia in your Team Yankee games.

Today, we're going to have a bit of a deeper dive into the French forces.

French equipment development certainly lagged behind that of the other NATO powers, and by the time the 1980's came around, the French Armee de terre did not have a MBT to rival the power of the Abrams or Leopard 2. Their tank, the AMX-30, was more akin in capability and power to the Leopard 1 even though the AMX-30 in service was more developed then its initial design.

To account for this lack of armoured firepower, the French would bolster their infantry divisions and equip them with Milan and HOT missile systems to take on Pact armour.

As discussed in our initial article, you have 4 formation options for the French in Team Yankee.

We'll take a look at the formations first and then cover off the support choices at the end.


AMX-30 Escadron Blinde 

The French armoured squadron fields the AMX-30 tank. Armed with a 105mm F1 gun which has a similar performance to that on the West German Leopard 1 but has no stabiliser.

To field the AMX-30 formation, you'll need to take the HQ of a solitary AMX-30. 

As you can see, the French commanders are pretty skilled but are somewhat reluctant in the morale stakes. The AMX-30 itself is pretty lightly armoured, so you're definitely going to want to take advantage of terrain and speed, as well as a Spearhead move if you can get it.


You have to take a minimum of 2 AMX-30 Peloton Blinde. These are feilded in groups of either 3 or 4 AMX-30 tanks. You then have 2 optional slots which can be filled with more AMX-30 platoons, up to two, or the you can forgo the 4th tank platoon and replace it with a Mech infantry platoon in AMX-10 transports.


For me, I'd definitely be look at weight of numbers here, given the low front armour on the AMX-30. You're really going to need a heap of them heading toward the enemy so you can ensure getting through to the objectives. Your support options will also be key here.


AMX-10 Compagnie de Chasseurs

The new means of warfare introduced in WW2 has not been forgotten and forces the world over have embraced this into the new world. Mechanised infantry is standard and the French are no different in this respect.

Equipped with the new AMX-10P AFV, the French infantry certainly does pack a punch into a reasonably small area. The AMX-10P is also armed with a 20mm autocannon and the option for the addition of a Milan missile for more firepower.

You have to select your Compagnie de Chasseurs HQ initially which is a single FAMAS Assault Rifle team riding in an AMX-10P

From there, you must take at least 2 AMX-10P Section de Chasseurs which come in 2 strengths:

- Full strength with 5 x FAMAS teams with anti-tank grenades, 2 x LRAC 89mm anti-tank teams and 4 x AMX-10P transports.
- Part strength with 3 x FAMAS teams, 2 x LRAC teams and 3 x AMX-10P's.
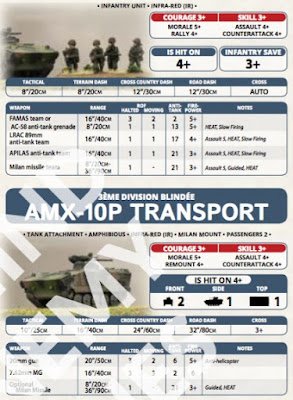

Both options also allow you to replace one of your LRAC teams with an APILAS team and you also have the option of adding 2 x Milan missile teams with their own AMX-10 transport. Obviously, there are point costs involved in these changes.

Your final 2 slots can either give you 2 additional Sections, or 1 section and an AMX-30 platoon.


The French infantry is a really great option in my opinion. They has a heap of firepower available to them, they can protect themselves from incoming chopper fire as well as protecting themselves from enemy AFV's and tanks. Supported by some armour to take some of the heat off, I think these guys have the potential to cause some serious trouble!


Escadron de Cavalerie

The French force developed some pretty interesting weaponry and included in that is the AMX-10 RC which was supplied to the Escadron de Cavalerie for use in their scouting roles. Unlike a lot of their NATO counterparts though, the AMX-10 RC sure packs a punch, being armed with a massive 105mm gun!

If you take an Escadron de Cavalrie formation, your HQ selection is each with a solitary VAB truck.

Your formation must then include 2 AMX-10 RC Peloton de Cavalerie at a minimum. These are equipped with the AMX-10 RC armoured car. Based on the AMX-10 hull, but adapted to be a 6x6 wheeled vehicle, it mounted the 105mm F2 gun in a turret.


You then have the option to take either another platoon of AMX-10 RC's or a VAB Section D'Infanterie. 


This one is an interesting one for me. The AMX-10 RC is definitely a glass cannon, it packs a massive punch but it's going to die to anything with a decent AT. It does have Scout and Spearhead which will help, but you're really going to need these protected if you want the formation to survive.

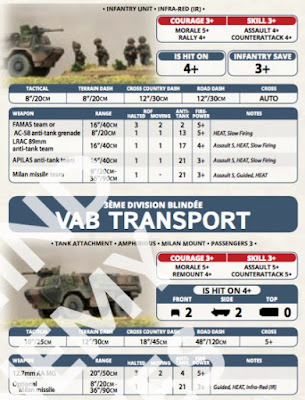
The other side of the Escadron de Cavalerie is the infantry, namely the VAB Section D'Infanterie. Similar in construction to their mechanised brothers in their AMX-10 transports, these guys are riding around in the VAB transport.

Your formation HQ consists of a sole FAMAS team in a VAB.

From there, you must take at least 2 VAB Sections, which can be fully equipped or partly equipped, as follows:

- Fully equipped with 7 x FAMAS teams with anti-tank grenades, 2 x LRAC 89mm anti-tank teams and 4 x VAB transports.
- Partly equipped with 5 x FAMAS teams, 2 x LRAC teams and 3 x VAB transports.

Again, you have the option here to pay to replace one of your LRAC teams with an APILAS team and you can also add a Milan team.

Once these are locked in, you can then choose to add 2 more sections to your formation. You then have a final optional slot which can include either:

- an AMX-10 RC Peloton de Cavalerie,
- an AMX-30 Peloton Blinde, or
- a Milan Section Antichar.


The Milan Section Antichar is pretty easy. Its a heap of Milan teams riding around in their own VAB transports! There are 3 section sizes, of varying point costs:

- 8 x Milan teams with 4 VAB transports
- 6 x Milan teams with 3 VAB transports, or
- 4 x Milan teams with 2 VAB transports.

That should sort out any pesky tanks that wander on by!


French Divisional Support

You're going to be relatively spoilt for choice in the support option you have at your disposal here, but they all have specific jobs to take care of and potential gaps to plug if you're short in any particular areas. Let's take a look at them.

VAB Mephisto Peloton Antichar


Mounting a HOT missile on the top of a VAB transport, the Mephisto adds another anti-tank option to your force. You can buy these in either 2 or 4 truck groups. The Hammerhead rule also means that you can fire their HOT missile and still retain your Gone to Ground status, meaning they're just a little more survivable.


AMX AuF1 Batterie d'Artillerie 


Built on the MAX-30 hull but sporting a mighty 155mm howitzer, the AuF1 serves as the mobile artillery for the French. You can buy these in batteries of 3 - 5 guns and with the Autoloader rule, you reduce the score needed to hit teams under a template by 1.


AMX Roland Batterie de Missiles Sol-Air


Mounting the Roland SAM missile system on an AMX-30 hull allows for AA capability to be brought to bear in the field. You can select either 2 or 4 SAM tanks.


AMX-13 DCA Peloton de Defense Anti-Aerien


Adding to the French air defence capabilities, the AMX-13 mounts twin 30mm cannons in its turret, enough firepower and ROF to dispatch enemy air and possibly keep some AFV's at bay as well. You can buy 3 of these for your force.


Gazelle HOT Patrouille d'Helicopteres Antichar


Much like the West Germans, the French also decided that strapping HOT missiles to choppers to chase armour all over the place was a great idea. Can't say I disagree...! You can get either 2 or 4 choppers here.


Gazelle 20mm Patrouille d'Helicopteres d'Attaque


As well as HOT missile, the French also equipped the Gazelle helicopter with a 20mm gun to act in a helicopter deterrent. Again, you have access to either 2 or 4 Gazelle's.


Mirage 5 Patrouille de Chasse


In your strike aircraft role you have access to the Mirage 5. Armed with both Belouga cluster bombs and a 30mm auto-cannon, this has the firepower to sort pretty much anything out. Your flight will include either 2 or 4 aircraft.


So there you have a run-down on the French forces you'll be seeing on Team Yankee tables pretty soon. I think they look like a pretty decent force, despite the lacking in the heavy tank department. You can get around this by adding a NATO tank formation from another nationality though.

Their Mech Infantry is pretty exciting and if you pay the extra points and add the APILAS to your platoon then any Pact armour is going to have a tough time getting close to you. The AMX-10P adds protection from BMP's but you still need to be careful here so as to not get overwhelmed by their numbers.

Let us know what you think of the French!

Next up, let's have a look at the Aussies!


25 April 2018

Free Nations in WWIII


The next volume in Battlefront's expanding library for Team Yankee hits shelves in a month. Free Nations will cover the Canadian, French, Dutch and Australian forces stationed in Western Europe in the fictional 1985 we play in.

We're going to take a look at each of the nations in depth over the next week or so in their own articles, but read on and we'll give you a brief synopsis of what you can expect to be fielding if you take one of these minor combatants in WWIII...


4 Canadian Mechanized Brigade Group

As you'd expect, the Canadians are armed with a variety of arsenal from the NATO partners. Your formation choices if you choose the Canadians are going to come from either:

- The Royal Canadian Dragoons armed with the German Leopard 1 MBT. These guys are reasonably skillful and resilient, but fielding the more lightly armoured Leo 1 means you're going to have to be pretty selective with your tactics.

- The 1 Battalion, Royal 22 Regiment. The Canadian Mech Infantry riding in the American M113 APC. These guys are your jacks-of-all-trades giving you access to infantry and the Carl Gustav AT teams.

In support roles, you'll get access to the Lynx recce vehicles along with the ADATS and Blowpipe air defence capabilities.

You can, should you desire, take an allied formation from any other NATO force and you'll also have access to US and West German support choices as well.


Armee de Terre

You get a few more formation selections if you take the French as well access to their unique kit. Here, you're going to get to choose from:

- 12EME Regiment de Cuirassiers fielding the AMX-30. While being the most lightly armoured of the NATO Tanks, the AMX-30 houses the CN 105 F1 gun which has more than enough bang to get through the Pact armour.

- 19EME Groupement de Chasseurs. The French Mech infantry are now using the MAX-10P transport to get them around the battlefield and they also have access to the excellent APILAS anti-tank teams and Milan missiles. 

- 3EME Regiment de Hussars taking the, somewhat strange, AMX-10 RC. This vehicle, while based on the AMX-10 hull, has a 6x6 wheeled config and is armed with a 105mm gun in the turret.

- 110E Regiment D'Infanterie which are being ferried in the VAB transport rather than the AMX-10. 

In support roles, you have access to more French toys including the HOT-armed Mephisto, the AMX AuF 155mm artillery, Gazelle helicopters and Mirages. You can also, once again, add another NATO formation as an Allied formation.


Netherlands 1. Korps

The Dutch are also armed with a variety of NATO equipment as well as some unique equipment of their own. If you decide to take a Dutch formation, you're going to be choosing from:

- 43 Tank Bataljon equipped with the West German Leopard 2 tank. The Dutch were the first export customer of the new Leopard 2 and started using them in 1981.

- 42 Tank Bataljon which are armed with upgraded Leopard 1 tanks.

- 42 Pantserinfanterie Bataljon. The Dutch Mech infantry are equipped with the YPR-765 transport as well as some firepower with both Dragon missiles and Carl Gustav anti-tank teams. They can also take, as part of the formation, the YPR-765 PRAT Antitank APC which houses an Improved TOW missile in a Hammerhead turret.

- 103 Verkennings Bataljon armed with the M113 C&V. Similar in development to the Canadian Lynx, being based on the M113 hull, it sports a 25mm cannon to allow a mass of suppressing fire and protection from helicopters. These act in a recce role in a Dutch force.

As before, you can also take another NATO formation as an Allied formation and you have access to West German support choices as well.


ANZAC Brigade

While based around the Australian Armed forces, I'm sure you can field these as a New Zealand force as well. They're your toys....

You have a couple of formation selections here. As they're listed in the book, they are:

- 1st Armoured Regiment armed with the Leopard 1 tank which replaced the British Centurion in 1976. They also have an M113 Cavalry troop inherent to the formation if you want to take it with both the M113 LRV and MRV available.

- 5th/7th Battalion, Royal Australian Regiment. Australia's M113 ferried Mechanised battalion. 

Support options include the Land Rover 88 equipped with a 106mm recoilless rifle in an anti-tank role, the M113 Redeye AA missile carrier and the Kiwi connection in the Scorpion armoured troop.

You have access to British support options here as well as your NATO Allied formation choice as well.


All in all, I think Free Nations is going to provide a lot more choice to people who are thinking about getting into Team Yankee but not necessarily wanting to play any of the major NATO forces. We'll look into a little more detail on the intricacies around each of these minor nations and their own special rules, and hopefully provide some more steer for people considering them.

As you've come to expect from Battlefront, the book is beautiful with a heap of colour and picture to get you inspired. Painting guides are in the back, of course.

There is all sorts of fluff on the forces depicted for each of the nations as well as a couple of new scenarios as well, which I think is a great addition.

Next article, I think we'll dive right in and look at the French. Yeah, that sounds good to me...


16 April 2018

Armoured Fist - Kingforce and the 40th (The King's) RTR


Things have been slightly busy at the BEL HQ, mostly with power cuts and other going's on, but time for us to get back on track. We promised you Churchills, so here they are....with an extra treat as well!


The North Irish Horse


To field the mighty Churchill, you're taking it as part of the 78th 'Battleaxe' Division at Longstop Hill.

You'll need to take a Churchill III Armoured Squadron HQ initially. This has a number of options for you to consider:

- 1 x Churchill III with its 6 pdr and 2 x Churchill CS with both a 2 pdr and 3" in the hull position.
- 1 x Churchill III and 1 x Churchill CS
- Either 3, 2 or 1 Churchill III tanks.

The Churchill CS is a great option here giving you both some direct fire AT on the heavily armoured chassis, as well as the 3" gun providing you an additional artillery option to dig infantry from their foxholes.

For your Platoon choices, you have a compulsory selection of a Churchill III Armoured Troop. This can consist of either 2 or 3 Churchill tanks.

Your second compulsory choice can then be either another Churchill Troop or you can take a Sherman Troop along side them.

You can then either take another Churchill or Sherman option as well as slots for 2 more Churchill Troops. Rounding out your Formation selections, there is also the option for a Rifle Platoon which we'll cover in another article.


Dan is especially looking forward to getting a game in with these monsters as he's had a Kingforce list built for a while. Keep an eye on the Behind Enemy Lines YouTube!


40th (The King's) RTR


Fielding the nimble and well-armed Valentine tanks, the 40th (The King's) RTR gives you these in spades!

Your Formation HQ is going to have 3 Valentine II tanks armed with 2 pdr AT guns at your disposal. These do struggle to get infantry out of foxholes as they have no HE, but this can be made up for elsewhere! You will have the benefit of the excellent armour protection the Valentine provides though.

You'll then need to take a minimum of 2 (up to a max of 4) Valentine Armoured Troops which can either be equipped with:

- 3 x Valentine II tanks, or
- 2 x Valentine II and 1 x Valentine VIII armed with the long barrelled 6pdr.


I must say, I like the idea of getting some Valentines built and on the table. They a pretty good all-around tank despite their short-comings and with the right support choices, they can really cause Jerry some problems!

Next up, we'll start looking at the infantry, but until then....


22 March 2018

Armoured Fist - 7th 'Desert Rats' Armoured Divsion


Today we'll start having a look at some more detail on the formations you can choose from in Armoured Fist. In this article, we'll be looking at the 7th Armoured Division, the Desert Rats.


The 7th Armoured Division became one of the most famous units in the whole war after seeing extensive action in North Africa against the Italian and German forces.

Through the desert campaigns, the differing brigades of the Desert Rats would be equipped with many different weapons including Crusader, Grant and Honey Stuart tanks.

In Armoured Fist, you'll have the option of fielding a number of different formations to represent the Desert Rats.


The Royal Scots Greys

The Royal Scots Greys has a proud history as a cavalry regiment dating right back to the end of the English Civil War through the Napoleonic Wars. At the start of WWII, they were a true cavalry regiment stationed in Palestine and was then reforming into an armoured regiment in 1941, training and honing their skills initially on the Honey Stuart before being equipped with the more powerful Grant.


Fielding the Royal Scots Greys in Flames of War means you're taking a Grant Armoured Squadron. You must field a Grant Armoured HQ consisting of either 2 or 3 Grants tanks. They're pretty well drilled these boys, you're hit on 4+ and they have a Motivation of 4+ as well, although you'd best hope too many don't bite it because your Last Stand is 5+. The Grant does benefit from Protected Ammo though, so you're remounting on a 3+

From that point, you have 2 compulsory choices to make. One of these must be a Grant Troop of 3 Grants. Your second choice could be either another Grant Troop, a Crusader Troop or a Honey Troop. You then have an option of another Grant Troop, should you want to take it (I would!!!)


County of London Yeomanry

You'll have opportunity to field a formation based around the 4th County of London Yeomnary (4th CLY) which was taken from it's sister unit in the 3rd CLY and then assigned under the command of the 7th Armoured Division. In Armoured Fist, you'll be fielding units from either B Squadron or C Squadron, both of which were equipped with the Crusader cruiser tank.


As always, a Formation HQ is your first choice here. You have two options with this one:

1. 2 Crusader II with 2 pdr and 2 Crusader CS with the 3" artillery gun, or
2. 1 Crusader II and 2 Crusader CS

Your compulsory choices then start with a Crusader Troop. You do have a choice to make here because you can take either a Crusader II Armoured Troop with 3 Crusader II tanks armed with 2 pdr guns OR you can take a Crusader II & II Troop which you can build with either 1 Crusader II and 2 Crusader III tanks or vice-versa.

The Crusader crews are a little more gung-ho than their brethren in the Grant so they have a To Hit rating of 3+. They have the same Motivation and Last Stand as the Royal Scots Greys but when it comes to skill, they need to get into Jerry's face quick smart! This is represented by the Tally Ho rule which gives them faster speed at the expense of tactics. Not a bad trade off....

Your second compulsory choice can then be either another Crusader Troop or you can add a Grant Troop for some heavier power.

Finally, you have the option for an additional three Crusader Troops to round out your formation.


The 8th King's Royal Irish Hussars

Another unit with an illustrious history, the 8th Hussars can trace their unit's lineage all the way back to the 17th Century and was also one of the units to participate in the Charge of the Light Brigade in the Crimean War...obviously not in Honey Stuarts though!


As you may have guessed, taking the 8th Hussars means you'll be fielding a Honey Armoured Squadron. These little tanks are quick and if they get into the sides of those pesky Panzers, the 37mm gun packs enough punch to deal with them!

Your Squadron HQ allows you to field either 3 or 4 Honey tanks. The are very similar to the 4th CLY in that they're hit on a 3+ and have a 4+ Motivation/5+ Last Stand. Much like the Crusaders, you want to get these in FAST, and so at the sacrifice of some skill, you move faster... 12" Tactical or 16" over terrain.

You have to take at least 1 Honey Troop consisting of 3 tanks. Your second choice, again like the 4th CLY, can either give you another Honey Troop or a Grant Troop for some heavy support.

The formation can then be rounded out with up to 2 more Honey Troops.


The Royal Wiltshire Yeomanry

Whilst not technically part of the 7th Armoured Division, I have included the Royal Wiltshire Yeomanry here to have a look at. In Armoured Fist, they're based on A Squadron of the 9th Armoured Brigade, 2nd NZ Division at El Alamein.

What's that mean? It means Shermans!


So, into the formation. You'll need an HQ which in this case consists of between 2 and 4 Sherman tanks. The tankers in the Shermans are a little more careful with their tanks so they're hit on a 4+. They maintain the Motivation 4+/Last Stand 5+ of the other British tank units though.

Into your compulsory selections, you've first got to take a Sherman Armoured Troop. Here, you have 2 options. You can either tank a Troop of 3 Shermans or you can mix it up and take a Troop with a Grant and 2 Shermans. This is representative of 3 Troop being armed with Grants at El Alamein.

You other compulsory choice can be another of the above or you can choose either:

- A Grant Armoured Troop,
- A Crusader Armoured Troop, 
- A Honey Armoured Troop or,
- A Churchill III Armoured Troop (which we'll cover in the next article...)

From there, you have another optional slot which can be either a Sherman or Grant Armoured Troop and a final optional slot which can be Shermans.

This has the potential to get some pretty well rounded arsenal on the table, depending on what points you're playing.


So that's gonna do it for the Desert Rats and our extra special guests. Next time, we'll be taking a look at the 78th 'Battleaxe' Division. Churchills!!!!

10 March 2018

Back into the Desert - Armoured Fist Review


With the latest volume for Flames of War Mid-war, we're back on to the Allied side of the ledger and now look at some more of the British Forces that fought in North Africa, this time the tank forces in support of the 8th Army.

Armoured Fist is going to allow you to field formations from the following:

7th 'Desert Rats' Armoured Division

- The Royal Wiltshire Yeomanry fielding the mighty Sherman.
- The Royal Scots Greys and their Grant's.
- The County of London Yeomanry fielding varying Crusader models, and
- The 8th Hussars and their Honey Stuarts.

6th 'Mailed Fist' Armoured Division

- 'Death or Glory' squadron comprising various tanks including Valentines and Crusaders.

78th 'Battleaxe' Division

- The North Irish Horse fielding the heavy Churchill tank
- The 40th (The King's) RTR and their Valentines 
- The Rifle Companies of the Argyll and Sutherland Highlanders


You'll also have access to support options for all formations to cover you in terms of air support, artillery support and other facets of combined arms.

As we've come to expect from these volumes from Battlefront, they're decked out with fantastic colour shots of the forces in action as well as a bunch of historical information on the battles in the desert such as Gazala and the Battles of El Alamein. 


Each of the different parts of the Divisions listed above allows you to field formations of specific British or American tanks in British service to suit your taste. From there you can select your support options as you'd expect.

If, for instance, you wanted to take a force of the might Churchill III (and with the coming plastic kits from Battlefront, why wouldn't you?!), then you're immediately looking at a North Irish Horse force to take these monsters.


While I won't be looking at each of the individual units in this article, I am going to take a look at what I think is my favourite; the Death and Glory Boys of the 17th/21st Lancers.


Like most other formations as part of V4 Flames of War, you have some compulsory choices to make here.

Your formation HQ can be made up of either:

- A Valentine III HQ with either 1 or 2 Valentine III tanks supported by 2 Crusader CS in both instances, or
- A Lee HQ with 3 Lee tanks.

From there, you must take:

- A Valentine III Death or Glory Troop of 3 Valentine III tanks, and
- A Crusader III Death or Glory Troop of 3 Crusader III tanks.


From there you have 2 more optional slots which you can fill with an additional Valentine III squadron or either another Valentine Squadron or another Crusader III Squadron.


I think the thing that excites me most about this one is the nature of how you play them. You just get straight up into your opponents grill with fast tanks like the Crusader while the highly armoured Valentines roll in behind to mop up.

You have to get them in there quick because they're Aggressive, meaning they're hit on a 3+ and while they have relatively good armour, you still need to make sure you have a few that make it through. 

With a few carefully selected support choices, you really have the makings of a great force!


So, there's your introduction to Armoured Fist. Over the next few articles, we'll delve a bit deeper into some of the other forces at your disposal.

And don't forget.....the like it up 'em.